|
|


Psylocybe Fanaticus sells a Technology Report for $10.00 called the PF Tek. It is still sold in its paper form. Normally, growing Psilocybe mushrooms is next to impossible for a beginner. However, the PF process is a break through and virtually guarantees that the beginner will succeed.
The PF Tek is the foundation for this document. The main purpose for this document is to detail the various ways the PF Tek can be adapted to various needs of the home cultivator.
Please treat this document as you would 'shareware software'. Try it out, and if it works for you, send $10 and a thank you note to:
The first time you use the process you should follow the directions exactly and resist the temptation to innovate. Innovation without experience is the primary cause of failure. If you must innovate because you can not find a particular item or for some other reason, first check with someone that has experience to make sure you are not doing something crazy.
It is our intent to provide the first time cultivator with the knowledge to make informed decisions about the growing process for Magic Mushrooms. The cultivator can select some adaptations that are felt to be worthwhile and reject others that don't have sufficient merit for him. It's his choice, but he is still guaranteed that if he follows the directions he will produce a crop of mushrooms.
This guide is published as a single document to make printing easy and simplify acquiring a copy to your local machine. There are several GIF files that it references in the directory that you found this document. You need these also. You might want to check and see if there is a file called mmgg.zip or mmgg.tar in the directory you found this document. If so, you can just get this one file and it will contain everything you need to obtain a local copy.
If you wish to examine an adaptation, simply click on it. When you're done looking at it, there will be two links. One back to the table of contents and one back to where the adaptation is used in the procedure.
One last note. A terrarium is required to complete the growing cycle. You can perform the steps to inoculate the culture jars and over the next few weeks build your terrarium. It takes time for the cultures to grow and this should provide you sufficient time to make a suitable terrarium if you are in a hurry to get started.
After the substrate is inoculated, you wait until it is colonized completely by the fungus. Once the substrate is colonized completely by the fungus, sterility is less of a concern because the fungus is pretty much able to fight off invaders and the rice cake substrate can be removed from the jar. This typically takes between two and three weeks to complete. At this point, the substrate is placed in a terrarium where high humidity is available to the fungus. While waiting for the substrate to colonize completely, no effort is required.
The terrarium is kept at around 90% humidity and the carbon dioxide that is produced by the fungus is constantly eliminated. Within a week of being placed in the terrarium, the rice cakes will start growing mushrooms. Within several weeks of being placed in the terrarium, the cultivator will have numerous mature mushrooms ready for consumption. The cakes continue to produce mushrooms until either the nutrients in the rice cake are used up or the moisture in the rice cake is depleted. Depending on how the cultivator chooses to implement the terrarium, more or less attention is required at this phase in the cycle. With the fully automated terrarium setup described later in this document, attention is only required every few days. Mostly, this involves picking mature mushrooms and adding water to the humidifier used in the setup.
It is very likely that the mushrooms will be produced faster than they can be consumed by the home cultivator once the cropping phase of the cycle starts. It is fairly easy to dry the mushrooms and preserve them for many months. In fact, some people prefer the dried mushrooms to their fresh counterpart. Being the master of understatement, let me state that they do not taste as good as mushrooms available in the grocery store.
Occasionally, a sterile spore print from a mature mushroom needs to be generated if the cycle is to continue. This is used to produce a spore syringe to inoculate new culture jars. It is a little bit of effort and requires very careful, sterile procedures to be successful generating a spore print. Of course, this can be circumvented by simply ordering a new spore syringe. A 10 cc. spore syringe should be sufficient to inoculate a dozen jars of substrate. It is the cultivator's choice which path to follow for successive generations.
Materials needed:
The canning jars need to be tapered. This means that the opening of the jar is wider than the body of the jar. This is important because the fully colonized rice cake needs to be removed intact from the jar. You simply want the cake to slide out when the time is right. If you use a jar that is not in the following list, check to make sure the box says it is a tapered jar. The following jars are acceptable:
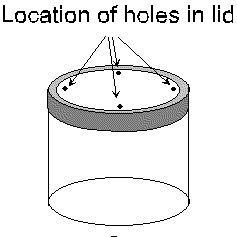
For each 1/2 pint jar mix 2/3 cup vermiculite and 1/4 cup brown rice flour in a mixing bowl. Adaptation-23 When these ingredients are well mixed, add 1/4 cup of water for each 1/2 pint jar you plan to prepare. If you are using 1 pint jars you need to double the recipe. Mix all of this stuff up well. This mixture is the substrate material that the fungus will consume and use for growth.
Step 3:
The next step is to fill each jar with substrate material. Adaptation-20
This document used to suggest gently packing the substrate into the culture jars. It has been found that keeping the substrate as loose and full of air as possible is the best way to fill the jars. The jars will colonize faster this way. Incidentally, the faster the jar colonizes, the lower the risk that some competitor contamination will get a foot hold and take over the substrate. Adaptation-3 Fill each jar to within 1/2 inch of the top with substrate material. If you run out of substrate material, either mix up enough for one more 1/2 pint jar or cannibalize a jar to fill up the rest of the jars. This is important because you need to make sure the substrate is high enough in the jars for the spore syringe to inject spores into it.
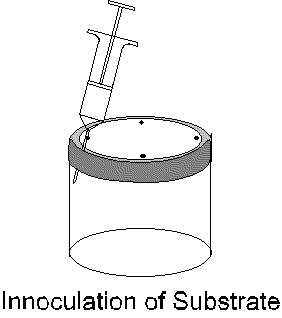
Shake the syringe. Make sure the spores are mixed well within the syringe. This can be accomplished more easily if you pull the plunger back on the syringe to get a little air into the syringe.
Remove
the tin foil from each culture jar as you prepare to inoculate it.
Insert the needle of the syringe as far as it will go into a hole in the
lid of the culture jar and get the needle to press against the glass.
Examine the next figure for a simple diagram of how things should look.
Inject 1/4 cc of solution at a site under each hole in the lid.
Adaptation-4
A total of 1 cc of solution for each jar.
Adaptation-5
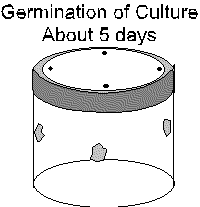
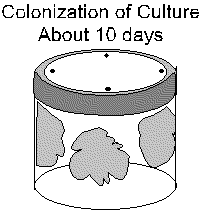
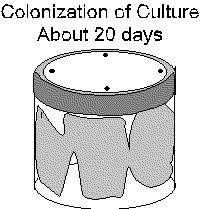
As the time goes by, the fungus will spread throughout the jar. Eventually, the entire surface of the glass will be covered with fungus. Typically, the bottom of the jar is the last area to be colonized. Be on the look out for any contamination.
Any odd colors that might appear are contamination and the jar must be thrown out. Do not take any chances. If you think the jar might be contaminated, throw it out!. Some molds and bacteria produce toxins that can kill you. Just because a mushroom is growing on the opposite side of the cake from the contamination does not mean you are safe. The mycelium network carries nutrients and moisture to the mushrooms from far away and can easily pick up the toxins and bring them to the mushroom. The fact that you are using this guide means you are not an experienced mycologist. You do not know which molds and bacteria are deadly. Do not take a chance.
The one exception to the previous statements is the mycelium will some times change from a bright white to a very pale yellow if it has water droplets touching it on the side of the glass. It is very unusual for any area that is colonized by the mushroom fungus to become infected while in the jar. The uncolonized areas of the substrate are usually significantly more prone to infection.
The above pictures show a typical germination and colonization cycle. If your spores are old, or the temperature is not optimum, or you did not mix the substrate very accurately you can easily add a week to the above time frames.
The
cake must stay in the jar until the entire surface area is covered with
mycelium. As the substrate gets more colonized, the growth slows down.
This is a result of CO2 building up and less oxygen being available for the
fungus to consume.
Adaptation-7
The cakes can not be taken out of the jars while there is still uncolonized substrate. Adaptation-8
Adaptation-10 Unscrew and remove the lid from the canning jars. Scrape all the loose vermiculite on the top of the substrate into the garbage. Take care not to gouge into the substrate material as this can leave areas open to infection. You do not need to get all the vermiculite off of the cake. In fact, the only reason to remove any of it is to keep the terrarium neat and orderly. Turn the jar up side down and slam it onto a table top. The rice cake should slide out of the jar. The rice cakes will typically shrink a little during the colonization phase of the process and will come out of the jars easily with a little tapping on a table top.
You can handle the cakes but remember that the less you handle them and the more gently you handle them, the better off they will be. Also, you should wash your hands thoroughly and be sure to rinse with water just as thoroughly to remove any soap before touching the cakes.
If you have disposable sterile gloves available, it isn't a bad idea to use them. You can get away without using them, but they are a good idea. Contamination is the mycophile's worst enemy.
Back to table of contents.
The Growing Cycle.
Construction of the Terrarium.
There are four different setups described in this document. The first one is a very simple, minimal terrarium that works well, but can only handle one rice cake. The second two are based on work done by Psylocybe Fanaticus. They will hold more cakes than the first terrarium, but they still require attention several times a day.
I encourage you to choose the last option. This one uses the same growing chamber as Psylocbye Fanaticus developed but an ultra-sonic humidifier is introduced to keep humidity up. It requires very limited maintenance and works very well.
The first terrarium, the "Poor Man's Terrariu" requires no humidification. It relies on a very small volume of air and the fact the terrarium is sealed very tightly from the outside environment.
All of the last three of the terrarium setups require the same growing chamber. The difference is the strategy for keeping the humidity high inside of the growing chamber. If you want, you can start with one of the simpler versions and switch to a different setup later if you are unhappy with it. Note that if you start with the ultra-sonic humidifier version, we don't expect that you will want to switch to one of the other two.
This terrarium is made by cutting a section out of a 2 liter coke bottle. This serves two purposes. First, it allows you to put a fully colonized rice cake inside the bottle. The second purpose is it allows the volume of the bottle to be reduced to the point where the moistness of the rice cake can keep it humid.
Remove a section of the bottle using the razor knife. The cut on the lower part of the bottle is not very critical. The top cut is more difficult to do correctly. It needs to be right at the point where the bottle is starting to decrease in diameter. This is because the top part of the bottle is going to be inserted into the bottom part of the bottle and the two sections need to seal tightly.
The best thing to do is start lower than the diagram indicates and cut small sections off until the top piece of the bottle fits snugly and easily into the bottom section. Once you locate the correct place to cut for the type of bottle you are using, you can simply cut at the same place and make multiple bottles to handle as many cakes as you wish to fruit at any time.

The cap for the bottle must be screwed on tightly. A damp paper
towel can be placed on the bottom of the bottle to help raise the
humidity inside the bottle. Twice a day the bottle should be opened
to allow new air to be available for the rice cake to consume. It is
best to fan the rice cake to insure new air is surrounding the cake
before sealing it back in the bottle. This is the major draw back to
this terrarium. If you have a dozen cakes it can become a burden to
exchange the air twice a day.
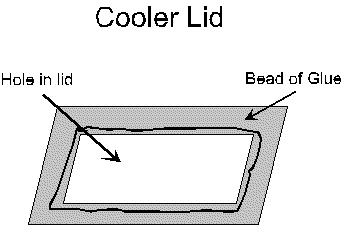
The cooler needs to have a very tight fitting cover. The idea is to seal in humidity, and the looser the lid is, the more difficult this is. Except for the cooler, everything you need can be found at your neighborhood building supply store. Below are diagrams detailing the various components of the terrarium. There is no way to predict the dimensions of the cooler that you will use. You will need to use some common sense as we walk you through the steps to build your terrarium.
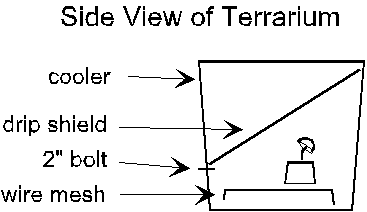
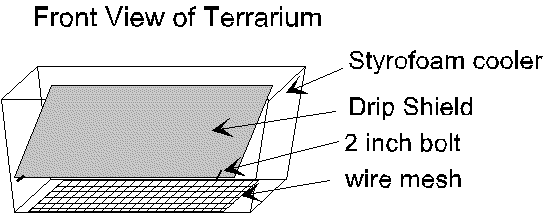
Next, if you are going to use the hand sprayer method of adding humidity, a drip shield needs to be installed. If you are using a fish tank bubblier or an ultra sonic humidifier, it is optional but still a good idea. As moisture condenses inside the terrarium, this protects the rice cakes from being 'rained' upon. Any moisture that forms on the lid of the cooler can drip and will be stopped by the drip shield from hitting the rice cakes. Any moisture that forms on the bottom side of the drip shield will form beads and run down to the side of the terrarium where it can drip harmlessly. If you use a piece of plexi-glass that is textured on one side, put the textured side pointing up. You want a smooth surface on the bottom side of the drip shield so that moisture can easily run down to the side of the terrarium.
The drip shield is held up by several bolts sticking through the side of the cooler. Depending on what size canning jars you use and the height of your wire mesh, you will need to figure out where to put them. You want the drip shield to be at as steep of angle as possible to make water run down it easily, but you want it high enough that your mushrooms have room to grow without touching the drip shield. The drip shield needs to fit well. You need a small gap on the edges to let air circulate, but keep it small. About 1/4 inch is good. In other words, the drip shield should fit pretty well to the inside of the cooler, but it is not supposed to be air tight. Also remember when shaping the drip shield that you can not go to the very top of the cooler because the lid will recess into the cooler a little ways.
If you are using a Styrofoam cooler, you should use washers on the bolts on both the inside and outside of the cooler. This will allow you to tighten the nuts on the bolts snugly to keep the bolts from tearing up the cooler as you move the drip shield during normal maintenance.
The procedure is this: At least four times a day the terrarium needs to have humidity injected into it via the spray bottle. At least twice a day the CO2 that has built up needs to be eliminated. Once a day you need to eliminate water from the bottom of the terrarium that has condensed and formed there.
Once a day, you need to remove the standing water from the bottom of the terrarium. You can use a turkey baster to suck the water out, or you can gently remove each cake and turn the terrarium up side down to drain the water out. If you remove the cakes, be very gentle. Any place you touch the cakes will not fruit. You should pick up the cakes in the same place every time.
Twice a day, the CO2 that has accumulated in the chamber needs to be removed. One method is to remove the drip shield and fan the inside of the cooler with the cover for 10 or 15 seconds. Another method that works well is to have a hair dryer next to the cooler and use it. Simply lower it into the terrarium with the exhaust jet pointing up and out of the terrarium and turn it on. It will suck all the existing CO2 out of the chamber. Be sure not to hit the rice cakes with the hot exhaust air. It will damage them. If your hair dryer has a 'cool' setting, use that instead of 'hot'. Incidentally, one cultivator recommends using a vacuum clean instead. He would simply suck the stale air out of the terrarium.
In order to create humidity in the terrarium a spray bottle that is capable of generating a fine mist is used. There are a lot of different products for use in the kitchen that have an adjustable spray nozzle, but if you choose to recycle one of these, make sure it produces a very fine mist. What ever you use, make sure it is entirely clean of the original chemicals. Let's make this perfectly clear. Make sure the bottle is clean and does not contain anything that will damage the fungus. The safest thing to do is go to the hardware store and buy a high quality spray bottle. These typically produce a finer mist than most kitchen type spray bottles. The problem is that you would not be using a spray bottle if you had a little extra cash so we are telling you that you can use a kitchen spray bottle if you are careful. In order to create the necessary humid environment in the terrarium, the nozzle is slipped under the cover of the cooler and sprayed at the center of the top side of the drip shield. See the following diagram:
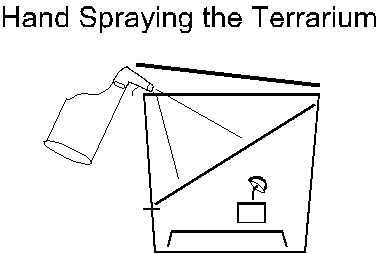
After spraying for 5 seconds, pull the spray nozzle out of the cooler and let the lid quickly close, sealing in the vapor. The small water drops will dramatically raise the humidity of the chamber. The rice cakes can not ever be sprayed directly. The mycelium is very fragile and doing that will damage it. The terrarium needs to be sprayed at least 4 times a day. More is better.
This setup and procedure will work and is very inexpensive, but that is the only good I have to say about it. You become a slave to your terrarium. If you miss a couple sessions, your fungus will most definitely suffer because of it. Also, you can only support a few growing mushrooms at a time using this procedure. The mushrooms pull a lot of humidity out of the air and this method doesn't provide much excess.
This method is inexpensive and allows the terrarium to exist without your constant attention. It's major limitation is that depending on how it is implemented, it can only raise the humidity by 15% over ambient. The minimum acceptable amount of humidity needed by the fungus is 85%. If ambient humidity is going to be less than 70% during the growing cycle, you will experience problems even with a fully optimized setup. If you have more than a few mushrooms growing, it is possible this system will fail to keep the humidity high enough. You still need to hand spray the terrarium occasionally to boost the humidity above what the bubblier can do. Several times a day is sufficient.
All of the materials needed can be obtained at any pet store or pet
department in a department store.
The basic strategy is to place a container of water inside the terrarium and slowly bubble air through the water. A hole should be cut in the drip shield to allow the container to stick up through it. The top of the container should be above the drip shield to protect the fungus from water droplets that will get produced. There are several ways the system can be implemented. If the air pump is setup outside the terrarium with just an air line going into the terrarium, the humidity will be raised less than 10% over ambient. The one benefit to this setup is the fact that air is constantly being exchanged and the home cultivator does not need to eliminate CO2 every day. A small hole can be put at the base of the terrarium to let CO2 and water escape. The hole should be just big enough that water does not bead up and plug the hole. A 3/8 inch hole will accomplish this nicely. Note that a small, snug hole needs to be drilled in the side of the cooler to allow the air line to get inside the cooler. You can not just loop it over the side of the cooler and slam the lid on it. You will not get enough humidity if the lid does not fit tightly. See the following diagram:
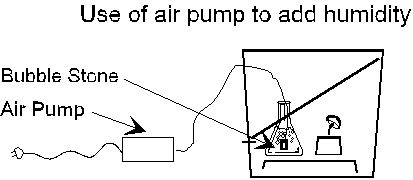
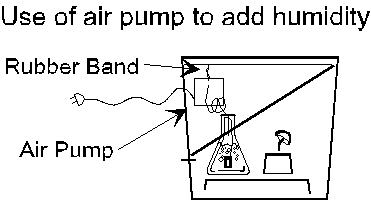
A second method to implement this strategy is to put the air pump inside the terrarium. This way the same air is constantly recirculated, constantly increasing its humidity. This can increase the humidity to close to 15% over ambient. This implementation has several disadvantages. First, the key to getting the higher humidity is recirculation of the same air over and over again. This means no hole can be placed at the bottom of the terrarium to allow water and CO2 to escape. You will need to eliminate CO2 at least once a day. The second disadvantage is the fact that the air pump generates some heat and can warm the terrarium by over 10 degrees F. This may or may not be acceptable. One point needs to be noted. The air pump will create some vibration. It is best to suspend the air pump from a rubber band to absorb this vibration. A stiff piece of coat hanger wire can be suspended from one side of the terrarium to the other and the air pump hung from it. Instead of the air tube going through the side of the terrarium, the power cord for the pump goes through the side. Also note that the positioning of the stiff wire to hold the air pump is not critical. It may be better to rotate it 90 degrees from what is shown in the following diagram so that it is easier to remove the drip shield when servicing the terrarium. Also, the power cord and air tube should have some slack in them so that are not being pulled on as the pump vibrates. The ideal scenario is to tie wrap them to the supporting wire. See the following diagram:
A steam humidifier is not easy to integrate into this terrarium setup. First, the vapor it emits is too hot and will kill the fungus. The second reason is they typically run full blast. They do not have a control to throttle them way back like the ultra sonic humidifiers do.
First, a small hole needs to be placed in the Basic Growing Chamber to let water and CO2 escape. It should be at the very bottom of the cooler. It needs to be big enough that water will not bead up and plug it. 1/2 to 3/4 of an inch is good.
This setup uses the ultra sonic humidifier to produce air that is close to 100% in humidity. The air flow out of the humidifier is limited by the fact that it has to travel through the 7/16 inch vinyl tubing. That is OK, because we want to limit the amount of air we feed into the terrarium. The humidifier will generate very humid air, but the air will also have many suspended water particles in it. Any time one of these water particles touches another water drop, they will merge. We don't want moisture forming on the rice cakes, so limiting the number of suspended water drops we allow into the terrarium is a big step towards this goal.
Even so, the air must be dried further. Adaptation-21 The air is passed through several stages where it is allowed to swirl and condense. Each one of these stages is comprised of an empty 2 liter coke bottle or some other suitable container. These stages are connected together using the 7/16 inch vinyl tubing.
Every time a piece of vinyl tubing is used, it needs to be fluted. This means it is not cut off square, but rather at a very sharp angle. This is necessary to help moisture that condenses inside the line to drip out once it reaches the end of the line. Otherwise, it will form a big drop and eventually plug up the line. At that point you have no humidity entering the terrarium.
Drill a 7/16 inch hole in the center of the exhaust lid for the humidifier. Insert a grommet. Apply a bead of silicon glue to the slit through which vapor normally exits. You want to plug this slit up. The only exit for vapor should be through a piece of vinyl tubing that will be placed inside this grommet.
Remove
the labels on the coke bottles. Any large plastic container can
be used but the 2 liter coke bottles are real nice because they allow
you to see inside. Adaptation-24
This is useful to determine if the terrarium is
running correctly later. Also, you will be able to see if moisture that
has collected in the bottle needs to be emptied out of it.
Heat up the threads on the 3/8 inch bolt using a propane touch or burner on a gas stove. A cigarette lighter will work, but it will take a long time. Hold onto the bolt with the pliers. When the bolt is hot, quickly and neatly poke two holes in each 2 liter coke bottle. Adaptation-15 See the following diagram for details:
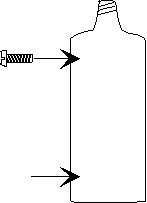
The bolt that is used is deliberately a little smaller than the hole that needs to be generated. The hot bolt will melt the hole a little bit bigger than it is when it pokes through the plastic bottle. You may need to insert the bolt a second time into the hole and let it touch the sides to expand the diameter of the hole. Some times little chunks of plastic stick to the side of the hole. Use a sharp knife to clean up the edges and insert a grommet. Check the fit of the vinyl tubing through the grommet. It should be very snug and air tight, but it should not collapse the inner diameter of the tubing very much.
Connect a piece of tubing from the humidifier to the first coke bottle. Flute both ends of each piece of vinyl tubing. Connect the this coke bottle to the next. Do this until you have all four coke bottles connected. The picture shows 3 coke bottles because that is what is normally required, but for now connect in all 4. Now connect the last coke bottle to the terrarium. You will need to poke a hole in the side and insert the tubing. The tubing should be blowing humid air into the part of the terrarium that is above the drip shield. It should be setup as follows:
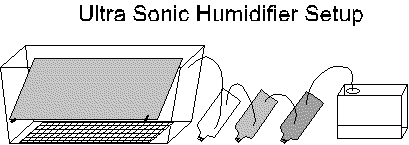
Set the humidity level at the minimum setting. This is still more than you should need. Adaptation-19 After you give it time to stabilize, you should see that each stage of the coke bottles has less fog in it than the preceding stage. Usually, 3 bottles is the right amount, but depending on your humidifier and ambient humidity, it could be more or less. You want the last coke bottle to just have the slightest hint of fog in it. Add or delete stages as necessary.
The humidity in the terrarium should stabilize at about 90%. The ideal amount of humidity is as much as you can get without moisture forming on the rice cakes. Keep in mind that most humidity meters you get at department stores are not very accurate.
Once you place a fully colonized rice cake in the terrarium it just needs several things to grow mushrooms. It needs high humidity, temperatures below 85 degrees F. and a little light. Once the mycelium network has gained access to enough nutrients the cake can initiate mushrooms if conditions are right. The initiation of mushrooms requires some light and temperatures in the mid to upper 70's F. The mushrooms can grow at higher temperatures, and in fact grow faster at higher temperatures. But the fact remains that the temperature range is fairly narrow to start new mushrooms. Normally, it takes about a week for pin heads to form if the rice cake was removed from the culture jar as soon as it was 100% colonized. It can happen after just a couple days if the mycelium network is well established, or it can take several weeks if things aren't just perfect for the cake.
If you keep the terrarium's temperature in the mid to upper 70's F. you will be constantly initiating new mushrooms (pin heads) while providing a good environment for the growing mushrooms to mature. This is the simplest way to grow if you can arrange for this to be the case. Adaptation-16 If you deviate outside of this temperature range, you will still get a few mushrooms, but the fungus will initiate new pin heads only occasionally. You will spend a lot of time waiting for a mushroom to form.
The rice cakes need a small amount of light to initiate pin heads. Mushrooms are not plants and do not need light to grow. However, P. cubensis is a phototropic mushroom. This means it needs light to trigger a hormonal response in order to form mushrooms. If you can see the rice cakes, there is enough light for this to happen. Many mycologists believe the reason light is important in the growing cycle is because it provides a reliable clue to the mycelium that it has reached the boundary of the substrate in which it is growing. In nature, P. cubensis often lives in a pile of cow manure. Once it has grown through the entire substrate and reaches the edge, light hits it and provides the mycelium with the information that if it forms a mushroom there, it can release spores into the air for distribution. It is not productive to form a mushroom inside the substrate because the spores can not be distributed in that case. Any normal spectrum of light that you have available will work. Sun light, fluorescent or incandescent are all fine and will work. A few minutes of light a day is sufficient but an hour or two will guarantee that pin heads form if everything else (temperature, humidity, the mycelium network is well established, etc.) is right. Be careful not to heat your terrarium too much if you use artificial light near the terrarium.
The rice cakes will have a very bright white appearance when they are first placed in the terrarium. Soon, they will be coated with a thin layer of fluffy mycelium. If the cakes refuse to fruit but continue to form more and more fluffy mycelium this is an indication that the humidity is too high and needs to be adjusted downward. For people using a humidifier in their terrarium setup, this is the single biggest cause of failure assuming they get the rice cakes colonized successfully.
When pin heads form, they will look like a short section of a common pin. Hence, the name. The end of these pin heads will soon grow dark brown. This is the cap beginning to form. When the rice cakes are fresh, the small mushrooms will start adding bulk rather than grow longer. They will form balls the size of a marble. Then, they will start to thin out and grow long, adding bulk the whole time.
If the mushrooms have mycelium growing on the caps, it is an indication that your humidity is too low in the terrarium. In this case, you have just enough humidity to allow the cakes to fruit, but you are right on the edge of failure.
You should avoid the temptation to grow the mushrooms as large as possible. Significantly more psilocybin is produced during the early periods of growth. By letting the mushroom grow too large you are simply consuming nutrients and moisture from the rice cake for no purpose. Also, the mushrooms taste increasingly bad as they get larger. Lastly, the mycelium network in the cake can only provide so much in the way of nutrients and water to maturing mushrooms. If you let the mushrooms grow too big, they will hurt the development of other mushrooms on the cake. The mushrooms should be picked just as the veil underneath the cap is starting to tear away from the stalk.
On the average, you should expect to get between 4 and 6 average size mushrooms per 1/2 pint cake. On the average you should expect each cake to produce 1 mushroom a week but this number can vary in either direction greatly.
As the cakes get older, they will produce less and less and it will be more difficult for the mushrooms to grow. Adaptation-17 This is a result of the moisture in the cake being consumed by the earlier mushrooms. You will eventually see mushrooms form and start to grow but never bulk up during the initial phase of development. These mushrooms will seldom get big enough to develop caps. You can harvest these mushrooms but it is an indication that the rice cake is about exhausted.
There are several ways to dry them, but we will only cover the best way. What ever you do, don't use heat to dry them. Heat is very harmful to the psycho-active compounds. You will drastically reduce the mushroom's potency if you use heat to dry them.
Materials needed:
Several pounds of calcium chloride can be purchased for a couple of dollars at any large building supply outlet. It will usually be found in the paint department because it is used to dry the air in musty closets before painting and things like that. If possible, get the bulk refill containers. It will be cheaper than the calcium chloride that comes with the units to hold it and the moisture pulled from the air. You won't be using the unit, so don't buy it unless you have to.
The drying chamber needs to have a space at the bottom for water
to collect. This allows the calcium chloride to function well for
extended periods of time. As it pulls moisture from the air, it
drips to the bottom of the chamber. The calcium chloride is held above
the water by a circular section of the 1/4 inch wire mesh with a
wash cloth spread out on it. See the following diagram for details.
The wash cloth keeps the calcium chloride from falling through the
wire mesh but any water that forms can drip through it to the bottom
of the chamber.
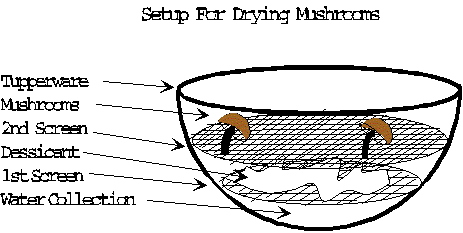
Cut another circular section of mesh so that it fits above the calcium
chloride and leaves a nice air gap. The mushrooms will be placed on
this mesh in order to dry them. Make sure the calcium chloride is
not touching the bottom of this screen. There should be an air gap
between the top of the desiccant and the bottom of the screen.
You do not want your mushrooms to touch the calcium
chloride while they are drying because some of it will dissolve into the
mushroom if this happens.
That is the entire preparation for preserving your mushrooms with minimal
loss of potency. In order to dry your mushrooms, simply harvest them and
place them on the wire screen. Close the Tupperware container so it
is air tight. The mushrooms will shrink and shrivel over the next couple
of days. After about three days, they will be fairly hard and contain
very little moisture. If you are not pushed for space inside the drying
chamber, you may was well leave them there for five or six days to
thoroughly dry them.
After the mushrooms have been in the drying chamber for three days, they can be moved to a zip-lock bag for long term storage. Remember that the dryer the mushrooms are, the longer they will keep. Adaptation-18
The reason this system works so well to dry the mushrooms is the calcium chloride is a good desiccant. It has a very strong affinity for moisture and can pull almost all the moisture out of the air. Eventually however, liquid will start to collect in the bottom of the drying chamber. Mushrooms are 92% water by weight. This moisture has to go somewhere when the mushrooms are dried, and it will eventually find its way to the bottom of the container.
When moisture starts to collect in the drying chamber you can simply drain it out and continue to use the old desiccant. The chamber will continue to work as long as there is sufficient calcium chloride in it. You should be careful not to contaminate the sides of the container or the top screen with residue from the desiccant. You do not want your mushrooms to touch the residue. For one thing, it tastes terrible, but in addition to this, the mushrooms will not dry completely. The residue will attract moisture. Whenever you empty the moisture, it is best to wash the Tupperware container completely.
OK, you've decided that your going to dose. After all, why did you grow these little devils if you weren't going to trip? The most important question to answer is how hard do you want to trip? If a 170 pound person had never done alcohol before, this is the advise I would give him. Dosage could be anywhere from 1 beer to 12 beers. 1 beer is just enough that you might feel something, but everything will be pretty normal. 4 beers is enough you will have a strong sensation of what alcohol does, but you will be in complete control. At 6 beers, you will start to be drunk. At 12 beers, you are pig drunk and may pass out. I would recommend 4 beers the first time out. This would give you a good feeling for what alcohol is about, but still keep you out of trouble.
These mushrooms will be fairly consistent in potency. They are all grown on the same medium under the same circumstances. If you take 4 average P. cubensis mushrooms, that will put you at the same relative spot on the spectrum as 4 beers. But remember that psilocybin is more powerful than alcohol. What you experience will be more intense than 4 beers. However, on the spectrum of what is possible, you will still be on the low side. What are average size mushrooms? Mushrooms are like snowflakes. No two are the same. I would call a mushroom that has a stalk 3 inches long and a cap 1 inch in diameter average.
Drying the mushrooms as described in this document will have minimal impact on their potency. Many sources claim that dried mushrooms are significantly less potent that fresh ones. If you use the method to dry the mushrooms described in this document, you'll find that claim is not true. It's your choice whether to eat them fresh or in their dry state. Some people have strong feelings one way or the other because of their taste. Most people agree that these mushrooms will never win any culinary awards. Try some each way. Find out if one way or the other is better for you.
Some people find that these mushrooms cause some nausea. AN165023@anon.penet.fi suggests the use of digestive aids available over the counter at any pharmacy. This will make consumption of the mushrooms a lot easier on you if you are susceptible to nausea. Also note, that most people should avoid consumption of alcohol while using these mushrooms. When the mushrooms are mixed with alcohol, even people with cast iron stomachs can loose their lunch.
If you find the taste of these mushrooms particularly distasteful, you can always bury them in a burrito or peanut butter sandwich. If you do this, it will slow the onset of the effects some what. Some people just chew them up and wash them down with orange juice.
Some people dislike the taste so much, they are willing to go to extraordinary measures to disguise the taste. Several popular recipes follow. With the exception of the first recipe, these recipes all suffer from a common problem. They use heat. Heat will cause some of the psilocybin to break down and as a result you will need to use more mushrooms for the same effect than if you had ingested them directly. This fact in and of itself is not too big of a deal. After all, you can grow as many mushrooms as you need. A 25% to 50% loss of efficiency is not ideal, but it may be worth it to some people in order to avoid the nasty taste of these mushrooms. The real problem is it is impossible to predict how strong the effect is going to be. It depends on how hot you heat them when you do the preparation and how long they are hot. Use caution!
Put several spoonfuls of frozen juice concentrate into a blender. Dole's Orange-Pineapple-Banana works especially well but regular Orange Juice or Lemon Aid will work. Add a bit of water, but keep the resulting juice on the strong side. Throw in a few ice cubes and your shrooms (fresh or dry) and whiz on high for a minute or so. Let it sit for a few minutes after you turn off the blender, then drink.
A 500 mg vitamin C capsule can be added and will make the juice more tart which is beneficial in masking the mushroom taste.
Using Ramen Pride or any other dried noodle soup, follow directions on package, except put cut and cleaned mushroom pieces in the broth. Prepare as usual. If the mushroom pieces are small they are relatively unnoticeable.
Cook your favorite frozen pizza according to directions. Several minutes before the pizza is done cooking, add finely sliced fresh mushroom pieces to the pizza. Optionally, you can add some grated cheese on top of the newly added mushroom pieces. Adding cheese will help encapsulate the mushroom pieces and dramatically help mask the taste. Place pizza back in oven and cook until done.
Obviously, some of the people that grow these mushrooms are going to be looking for a 'mind melting' experience. Bad trips on mushrooms are rare, but they do happen. One of the most common reasons for bad trips on mushrooms is taking a high dose of mushrooms that have grown on cakes that also have contamination growing. Toxins get absorbed by the mushrooms growing on these contaminated cakes and as the dosage gets higher it starts to become an issue. Care should always be taken to avoid contamination but if you plan to dose on the high side, it is absolutely mandatory. Think about it. How fun would it be to have a nasty allergic reaction to some toxin while tripping hard. The email I've received on the subject suggests it is not very pleasant. Throw out any cake that is contaminated and any mushrooms that were grown on that cake even prior to when the contamination was noticed.
One final note. If you ever find that you have dosed too heavily, just remember that 90 minutes after ingestion will be the peak experience. Things will start to settle down after that. The good news is that medically you can't overdose on psilocybin. If you remember these things, and believe them, they can help ease you through a high dose experience.
In order to use the process detailed in this document, you need a sterile, viable spore syringe. The spores should be Psilocybe Cubensis spores. Preferably, they should be of the Amazonian strain. The Amazonian strain has wider parameters for fruiting and is more tolerant of mistakes. However, any Psilocybe Cubensis strain will work. There are several ways to get started. The easiest way to get started is to order a spore syringe but alternatively, you could obtain a spore print and use that to prepare a spore syringe.
Once you have grown some mushrooms, it is worth while to learn how to generate your own spore prints so that you can produce spore syringes when ever you need one. Currently, you don't have to do this if you choose not to because the spores are still readily available from mail order suppliers. Many people believe the day is coming when this will not be true. Many of the sources of psilocybe spores have quit selling to the public and others have destroyed their cultures because of mandates given by the DEA. If you have a sterile, viable spore print, you can eliminate your dependence on these suppliers.
If you are outside the United States, there is a $10.00 shipping charge. All their packages are shipped in a discrete manner. However, be aware that outside the US, a customs sticker with the description "mushroom spores in blunt-tipped pipette" is stuck on the box.
If you wish to minimize the paper trail, you can send cash to Psylocybe Fanaticus. They are totally reliable and you will get what you order. Psylocybe Fanaticus advertises that they do not keep customer files and by sending cash, you can distance your self from any records of the transaction.
If you learned about
Psylocybe Fanaticus
here on the Web, please mention
it when you order. Currently, Psylocybe Fanaticus doesn't believe much
business comes their way because of the net. We would like for that
to change.
Also of interest is the fact that this supplier can provide you with either the standard strain of Psilocybe cubensis spores or 'Gulf Stream' Psilocybe cubensis spores. The 'Gulf Stream' strain is slightly more tolerant of heat and fruits a little easier in warmer temperatures. The standard strain is more appropriate for cooler climates. Simply specify which one you prefer when you place your order.
Check, Diners Card and American Express are accepted.
Phone: (519) 433-5267
Fax 433-7725
E-mail: hemp@hempnation.com
http://pobox.com/~hemp
On the net they have a site: WWW.HEMPBC.COM
Mostly, this section is included just for completeness. In the event you can not obtain a spore syringe for some reason, you can get a spore print and use that to make a spore syringe.
The following information was pilfered from the mushroom FAQ on Hyper-Real.
Homestead Books              P. cubensis spores ($25), kits ($70), and
P.O. Box 31608               books/videos about growing.
Seattle, WA 98103            (Phone: +1-206-782-4532)
Pacific Exotic Spora         Panaeolus cyanescens and Coplandia cyanescens
P.O. box 11611               spores.  Very expensive, $40-$75.
Honolulu, HI 96828
The Shroom King              Str. cubensis print and a book for $25, above
P.O. Box 17444               above plus compost and agar for $35.
Seattle, WA 98107            (Phone: +1-206-784-9328)
SYZYGY                       $15 + $1 (S&H) for a Str. cubensis print
P.O. Box 619                 on a slide.
Honaunau, HI 96726
J.L.F.                       Supposedly sells some rare species ready
P.O. Box 184-SC              to and lotsa weird stuff.  Free catalog.
Elizabethtown, IN 47232      (Phone: +1-812-379-2508)
Materials needed:
Several things need to be accomplished. First, we need to sterilize a shot glass to easily mix the spore solution and we need to sterilize a syringe to hold the solution. We also need some sterile water in which to suspend the spores. The following procedure will accomplish all of this.
Fill a coffee mug with water and place a shot glass inside the coffee mug. Make sure the shot glass is completely submerged. Place the coffee mug in the microwave oven and get the water to a full boil for 10 minutes. It does not need to be a violent boil. Adjust the heat level of the microwave oven to keep too much water from being lost if necessary.
Remove the shot glass and empty the excess water out of the shot glass. Place another glass over the shot glass. This will keep air born contaminates from settling in the shot glass while you wait for the shot glass and water in the spore syringe to cool.
Fill the syringe with hot water from the mug. Eject the hot water and repeat several times. This will insure the inside of the syringe and the needle are clean and sterile. This is especially important if you are using a syringe from a previous crop. When the needle is inserted into the substrate, it is possible to get nutrients up inside the needle and for contamination to grow. The last time you fill the syringe with hot water, do not purge it. Let it sit in the syringe until it is cool. This is useful for two reasons. First, the continued heat from the water can still work to eliminate any remaining contaminates. Secondly, once the water is cool it can be used as the sterile water needed to fill the syringe. Make certain that nothing touches the needle of the syringe.
The Psilocybe mushroom spores will be killed if they come in contact with anything too hot. You need to wait until the shot glass and spore syringe are at room temperature. When it is safe to proceed, use the cigarette lighter to flame sterilize the X-Acto knife and the needle of the syringe. Let the blade of the knife cool, but make sure it does not touch anything. When it is cool, carefully open the spore print and scrape a fleck of spores into the shot glass. A fleck 1/4 inch by 1/4 inch is more than sufficient for a 10 cc. spore syringe. Use the needle of the syringe to stir the spores into a few drops of water. Usually, there will be a few drops left over in the shot glass from when you emptied it. Otherwise, you can get the drops from the syringe. Stir the fleck of spores until they are well broken up and 'dissolved' into the water. Purge the water out of the syringe into the shot glass. Pull the water back into the syringe, being sure to suck the spores in also. Do this once or twice more to make sure the spores are well mixed in the spore syringe. Often, it takes several tries to get the spores fully broken apart and well mixed.
If the spores in the print have been dried and are not fresh, it is best to wait six hours to use the spore syringe. The spores need to rehydrate. If your in a hurry, the spores can still rehydrate in the culture jars.
Sterility is key. Adaptation-25 Be careful not to do anything that will compromise the sterility of your spore print. The typical procedure is to cut the stalk off of a mature mushroom very close to the cap. A sterilized knife or razor blade is used to do this. The cap is then laid on a sterile piece of tissue paper or card stock and a small glass set over it. The glass is needed for two reasons. First, it keeps the spore print insulated from airborne contaminates. Secondly, it helps keep the humidity high so the mushroom cap can continue to live and drop its spores. One note of caution. Some humidity usually needs to be allowed to escape. You want the environment inside the glass to be slightly less humid than the environment in which the mushroom was grown. If you have problems getting a cap to drop its spores, try using a piece of paper for the print that fits entirely inside the glass and spreading out a wash cloth flat on the table. Let the edge of the glass seal to the wash cloth instead of the paper. This will usually allow enough humidity to escape to cause the cap to drop spores.
If everything goes well,
after a day or two the cap will drop its spores.
Adaptation-26
There will be a
purple-brown dust underneath the cap. These are the spores.
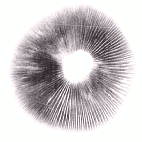
Once you have a spore print on the paper, remove the glass and cap. Fold the spore print in half and seal the edges so air can not get in. A piece of scotch tape on each side will do nicely. The spores will stay viable for 18 months if they are kept in a cool, dry and dark spot. If you place a small amount of desiccant in the bottom of a film container and place a cotton ball on top of the desiccant, you have an ideal container to keep the spore print. The cotton ball will keep the desiccant from touching the spore print. Seal the spore print in the canister and place the canister in your refrigerator until you are ready to use it.
Note that if you want to be self sufficient, it is a good idea to have multiple spore prints and store them separately. You just never know when you are going to be surprised with a massive contamination problem or thermal death. The safest thing to do is have a couple viable spore prints so it is easier to recover from disaster. A spore print is typically viable for about a year if it is stored in a cool, dark location. As a print ages, germination gets slower and this process becomes more prone to contamination.
If it is your intent to use a mushroom to immediately generate inoculant for a successive crop, you can eliminate some of the above steps and reduce the risk of contamination.
Poke a small nail hole in the cap of a wide mouth jar. Cover the nail hole with a piece of electrical tape. A 1/2 pint canning jar similar to that used for the cultures is fine. Sterilize both the jar and the lid.
Place the harvested cap in the sterilized, wide mouth jar. Seal the top with the lid and wait until a spore print has been generated on the bottom of the glass. Open the jar and remove the mushroom cap. Add 3/4 cup of sterilized water. Seal the top of the jar with the lid and shake the jar. The spores need to be mixed well into the water. This procedure elements the need to transfer spores from a print to some container to make the solution. The spore print is generated inside the container and the only extra step is adding water. It also has the benefit of making a large amount of solution that is easy to use.
Now, any time you need inoculant, you can shake the jar and peel the tape back to expose the nail hole in the lid. Simply insert the needle of the syringe into the inoculant and pull some into the syringe. The syringe needs to be sterile or you risk contaminating the entire jar of solution. The solution will keep longer if you refrigerate it. You still should keep some spore prints on paper because it is possible to contaminate the entire jar of inoculant if you make a mistake.
I never was around people that used psychedelics much. The few times I had the opportunity, I was unable to find out enough about the source and quality to put my ignorant self at ease. It seemed like I was never going to get to have a psychedelic experience.
Well, I was surfing the net one day and decided to test the reach of information contained on it. I was trying one exotic topic after another in Yahoo. I was amazed at the knowledge contained on the net. I decided to push it to the limit. I asked about psilocybin. To my amazement, a few indexes to documents came back. I quickly down loaded them and started studying them. I was astonished to find out that the spores for Psilocybe mushrooms could be mail ordered because the spores did not contain any controlled substances. And best of all, there was no overdose for psilocybin.
It doesn't take a rocket scientist to figure out what I was thinking! The net contained bits and pieces of information. I was able to learn some of the basic concepts for growing shrooms but there was a lot of uncertainty and contradictions in the information I had. I kept increasing the depths of my searches on the topics. It eventually became obvious that my best chance of success lay with Psylocybe Fanaticus' method. I promptly ordered their Tek Notes and a spore syringe.
I followed their directions and had cultures well under way soon enough. But, I was frustrated with their humidification techniques. They did not work for me even though I experimented like crazy. My job involves doing research and development at a high technology computer company. I was determined to solve the problem and make it easy for others with access to the net to succeed. I found a few people on the alt.drugs news group that had vast mushroom growing experience and they helped me with advice that got me over some of my initial problems.
I was going home in a few months on vacation to visit old buddies. I told them I thought I was going to be able to bring some shrooms so we could all trip together. They freaked with joy. I have a basic personality flaw. Anything worth doing, is worth doing to excess. I didn't know how many shrooms I would need so I figured I had better grow a couple pounds. I worked out the problems I was having and simultaneously ramped production. I had a couple pounds of dried mushrooms by the time I headed north on vacation.
We were at a friends cabin on the lake when the time was right. I broke out my stash of shrooms as we prepared to go out on the lake fishing. Of course I offered some advice about what I thought was a reasonable first dose, but then I made the mistake of trying to comfort them with the information that it was impossible to overdose on psilocybe mushrooms. My friends have my same basic personality flaw about doing things to excess as I do, except worse. The closest I can figure, I ate about an eighth of a cup of crushed, dried shrooms and they all ate about twice that. My first dose was significantly higher than the Dosage section of this document recommends. Just because I got away with it, doesn't make it a smart thing to do!
Being the scientific type, I grabbed my camcorder just in case we needed to document anything and we headed to the boat to go fishing. The first 25 minutes seemed pretty normal, but then I started to feel myself coming on. I had done enough research to know that the peak experience was a good hour away. I kept fishing. Soon I had to put down my fishing pole and just watch my buddies. I just had way too much stuff going on to be holding my fishing pole.
I had heard that the most basic visual experience was how colors became vibrant while tripping. I kept looking for this, but never noticed it. I was wondering if we dosed high enough or if I had gone to all the trouble to grow these damn things and eat those awful tasting shrooms for nothing. I started to feel a little down. I just stared at the seat where one of my buddies was sitting.
Suddenly the seat was alive. I became mesmerized by how the grain in the wood seats of the boat would not stay still. Every time I looked at the seat, it would ebb and flow. Too cool! The surface of the water was even more intense. The patterns formed by the little ripples and waves were unbelievable. I was frying big time. Even though my buddies dosed way higher than me, they seemed unaffected. They just kept fishing and cracking jokes. I was still 30 minutes from peak.
I was looking across the lake at the far shore. There were lots of clouds blowing across the sky. I was enjoying just watching them. Then it happened. It became obvious to me which clouds were going to break apart into little clouds and which little clouds were going to combine to make bigger clouds. I spent a lot of time trying to figure out if I was just imagining this ability or if I could really do it. I just kept watching the far shore. Eventually my buddies noticed my fascination with the far shore and I became the focus of their jokes. They still didn't seem like they were tripping. I told them about my new found ability. That only encouraged them to make more jokes. I challenged them to predict which clouds were going to break apart and which ones would combine. They admitted that would be impossible. When I told them I thought I could do it, the jokes really started.
Naturally, I had to prove I wasn't making up this ability. I started pointing and telling my buddies which clouds were going to do what. They were real skeptical at first, but finally I convinced them. One of them realized that we ought to get this on the camcorder tape or nobody would believe this had happened. It was a little work to get the camcorder setup because we were so fucked up, but I got about 5 minutes of this on tape. This was real valuable in making me a believer that psychedelics really can expand your mind and give you insight that you never had before.
Later that day, everybody commented on how they thought they were the only one affected by the shrooms until the cloud incident happened. We were all having a good time, but nobody recognized that the others were tripping hard. I was only at 1/2 the dose my buddies were at, so it's not too hard for me to believe they were really looped.
The next day, everybody wanted to trip again. I gave them some advice. I told them that a person's tolerance builds quickly to psilocybin and that they would have to dose significantly higher to get the same effect. Interestingly enough, they all thought they wanted a little less of an experience. The first trip had tired everybody emotionally and intellectually. Strangely enough, that day, straight or tripping, I was unable to repeat my cloud predictions. It seems to have been a one time experience. Yet, I know and have proof I was able to do it that one time. It turns out the real life value of being able to predict cloud behavior is pretty small, but the important point is that psychedelics can give you insight you would not have had otherwise.
When we got back to town, all my buddies wanted me to teach them how to grow shrooms. My buddies are not very scientifically minded people. I have been trying to get them to use computers and get on the net for a long time with no success. I did not think I could just explain the steps and have much probability of them succeeding. I thought about this problem for a little while. I wanted to write a comprehensive guide for the people on the net and I wanted to get my buddies on the net. I could kill two birds with one stone. I told them that if they figured out how to get on the net, I would have a simple guide there for them to follow.
This section is for the mycrophile that has some experience and desires to cultivate a large crop of mushrooms. This section is intended for someone that has already grown several crops using the PF Tek procedure detailed earlier in this document. This section assumes a certain amount of experience and expertise. Please do not attempt this technique without first gaining the experience; you will most likely fail if you do so.
The procedure detailed earlier in this document is the best one known for making it possible for a first time cultivator to succeed. But it is very inefficient and the culture jars take a significant amount of time to manufacture and colonize. If you desire to grow a large quantity of mushrooms, you will find it is not practical for your needs.
The following procedure is an adaptation of the traditional mushroom cultivation techniques. It assumes you have some experience and don't need to be warned about this and that. The following description of the bulk growing procedure should be sufficient for an educated person to follow. There are many fine books on the subject and rather than compete with them, I suggest you get one if you start having difficulties The Mushroom Cultivator However, if you are careful, these directions should get you a truck load of shrooms.
There has been such a demand for instructions to accomplish growing on a bulk substrate, the author has decided to help. But the following process has not been 'idiot proofed' yet. You will need to use common sense and adapt as issues arise. Please note that this process depends on sterile procedures being in place. If you fail, it will most likely be because you introduced contaminates.
Materials needed:
The first step in the process is to generate several spawn jars. Place 2/3 cup of Rye in each canning jar. Add 3/4 cup of water to each jar. Loosely screw on the caps and sterilize the jars in the pressure cooker. 45 minutes at 15 PSI is usually good. Note that a pressure cooker is necessary for several reasons. First, bulk grain is more difficult to sterilize. Secondly, in order to get the grain to absorb as much water as possible, pressure is required.
As the Rye cooks, it will expand and all of the water should soak into the rye. Let the jars cool to room temperature. The rye should be loose and break apart if you rotate the jars. That is the main reason rye is used instead of some other grain. This will be important later.
At this point you need mycelium to inoculate the grain. You will need a clean food processor and set of blades for it. If you can sterilize it in the pressure cooker, this is best. If not, throw it in the dish washer with lots of soap. Don't open the pressure cooker or dish washer until you are ready to use it.
If you are using a mushroom, perform the following steps. Sterilize 1/4 cup of water. Let it cool. Put the water and the mushroom into the food processor and turn the mixture into a slurry. Don't mix the slurry more than you need to. You are creating small fragments of mycelium by chopping up the mushroom. The more you chop it up, the more damage you do to the small pieces of mycelium.
Open each spawn jar and place 4 or 5 cc's of the prepared slurry in the jar. Close the lid and rotate the jar so the Rye kernels tumble and mix inside the jar. The idea is to get as many kernels as possible to have mycelium fragments on them. Loosen the lid and place the jars in a warm, dark location.
There are several reasons why tissue from a mushroom is preferred to spores for the inoculation of the spawn jars.
If you are using a 100% colonized culture jar, perform the following steps. First, the culture jar should have been 100% colonized for at least a week. This lets the mycelium grow into the cake and results in more of it being available for the inoculation. Birth the cake, and place it in the food processor. Turn it into little pieces smaller than a pea. Dump the sterilized rye into the food processor and turn it on just long enough to mix things up well. Place the contents of the food processor back into the jar and cover it loosely.
The cleaner your environment the more likely you will get through this stage without introducing contaminates. This is the most likely place to induce failure.
Loosen the lid and place the jars in a warm, dark location. In 3 or 4 days you should see isolated spots with white mycelium growing. Check the spawn jars periodically. When you see large areas of aggressive growth, tumble the Rye to mix things up. Rotate the jar enough to thoroughly mix the kernels. The idea of mixing the Rye is to get kernels with mycelium growing on them scattered throughout the jar. Ideally, no kernel should be too far from a kernel with mycelium growing on it. Repeat this process every 3 or 4 days when the mycelium growth has been aggressive for a while. Once there is mycelium growing within 1/2 inch of every other location no further mixing is needed. At this point just let the mycelium expand outwards until it is every where.
Once every kernel has mycelium growing on it, leave the jar sit undisturbed for a week. The idea is to let the mycelium grow as fast as possible.
Sterilize more jars filled with rye and water. Let the jars cool.
Most food processors have a plastic blade that comes with them for the purpose of mixing things instead of cutting things. Use this if possible. Make sure your food processor and blade are clean. Empty the contents of a colonized spawn jar into the food processor. Turn it on until the Rye kernels are all broken apart. Add some of the freshly cooked Rye to the food processor. Depending upon your confidence and the sterility of your environment you can add anywhere from 4 to 20 times the amount of grain in your spawn jar. The less you add, the less likely you will have problems with contamination. The more you add, the faster you can create substrate. Initially, you should stay on the low side. Turn on the food processor and mix the freshly cooked Rye with the colonized Rye from the spawn jar.
Place this material in a container that can be loosely covered. This material should be treated exactly as the earlier spawn jars were treated except you should see quicker growth of the mycelium patches. The amount of spawn you have can be compounded again and again until you have enough to inoculate massive substrates.
Once you have sufficient spawn colonized and available for your substrate, lay it out in a deep cake pan to a depth of 1.5 inches. Attempt to keep the surface even. If you have a very clean environment, you can perform a mass expansion and lay out the uncolonized grain instead of waiting for it to colonize in the jar. This will save several days and a little effort, but in general it is not worth the risk.
Cover the pan with a sheet of plastic wrap. Do not seal it absolutely tight, but make sure that very little air is exchanged. Note that some air does need to be exchanged to keep the CO2 level from getting too high. But air exchange increases the likelihood of contamination. Keep it to a minimum.
This is one of the big benefits to bulk substrate growing. Whatever grain is not used to prepare a substrate can be used as spawn for new jars. When you get to this point in the process, you can easily be preparing a new bulk substrate every couple of days. You just make sure you never use all of the colonized grain as substrate. You hold back some to use as spawn for the next set of jars.
Wait a few days until the freshly laid out substrate is showing aggressive growth. Laying out the grain breaks up the mycelium networks, and it takes several days for the mycelium to recover.
Step 9
Casing the substrate is the next step. Various recipes are available but the simplest one consists of course ground vermiculite and water. Course ground vermiculite is a requirement because the fine ground vermiculite packs too tightly and seals the substrate.
Soak the vermiculite in water. Wring it out, but leave it fairly damp. Later versions of this guide will have exact measurements but for the moment, you will need to adapt. If any of you think you have an optimum mixture, please post it in the alt.drugs.psychedlics and rec.drugs.psychedlic newsgroups.
Lay out the casing material to a depth of 3/4 of an inch. Try to keep it smooth because this will result in the mycelium poking through everywhere at the same time. Cover with plastic wrap and wait. Typically, it will be about a week for the mycelium to break through the surface of the casing.
Step 10
Initiate fruiting. Take the plastic off of the pan and place it in your terrarium. Make sure you have the temperature at about 75 F. Have some indirect light available. As pins start to develop, use a hand sprayer to mist the casing and keep it moist. But be careful. Do not saturate it to the point of being wet and having water drops that will not soak into the vermiculite.
Step 11
After the first flush, you can get a smaller second and third flush if you let the substrate rest for a while. There are a lot of factors affecting this. One particularly important factor is home much of the first flush's moisture came from the substrate and how much came from the casing. If you can mist your casing several times a day, that will help the longevity of your substrate.
If you can not find an ultra sonic humidifier, you can use other humidifiers. Don't get too hung up with this item. The big problem to watch out for is heat. If you get forced to use a humidifier that is not ultra sonic make sure it does not put out a warm mist of air. Any ultra sonic humidifier can be made to work. This statement is not true of other humidifiers.
Prices vary dramatically, but a big bag of it with several cubic feet of vermiculite usually runs less than $10.00. Much smaller bags are available and sell for several dollars.
If you can't find vermiculite in any of the well stocked garden centers in your area, you can call Piedmont Pacific. They are a large supplier of vermiculite. Their phone number is 1-770-725-6853. You can ask them for the name of a store in your area that sells vermiculite.
Back to preparing the substrate.
Back to Terrarium Construction.
Back to table of contents.
If you have a suggestion, you can get it to the author of this document by posting it to these same newsgroups. If you have something you only want the author of this document to read, please encrypt it with PGP and post it to the above newsgroups. I will see it. My PGP key is:
Type Bits/KeyID    Date       User ID
pub  2047/B9182FE9 1996/08/24 MMGG Author
-----BEGIN PGP PUBLIC KEY BLOCK-----
Version: 2.6.3i
mQENAzIfd0cAAAEH/14DazcVKv1eRlNgt48GHgDurYxoyfB/5W7eNITF/6mCxa1I
0462zDjshitLqEQDYkg0FgYEsr7rRpVJzs4JIc3swizy+e1c+dOxyB4ALswzJvMv
u5OVw+ddAT6+Qqcqo5LbiFoGmTYWoK8BVtmc0ifzDk7GGmX3Yj4wic+/G1eslIew
dcBgcAZF9bQRtI36EgMLAktpb6gnC0tc2MyNxdY/BlRZ4bMsmqc/lgJumWZQkJyj
bamWsOnueRaFyQjOLWrN6okHP0FZaw3wUgsre/oqa2hSvKxTNjKtMocVVG7EkutO
+hAkGfPoSmwrjnHHiveXdIney1R0Vx/1prkYL+kABRG0C01NR0cgQXV0aG9yiQEV
AwUQMh93R1cf9aa5GC/pAQEH0gf+JYJ7VujOjjJZvLsL0Vn2n/Ny3ZFF4dxnKDIJ
y4+Fdnx6Q8v11Q8VNgzUN15bKKn2SfUZXc6eTJ7JS3T2HKWl6by0I5mQlJNdLBTe
DYzybI5HP+briaGJm9eyrnuhCk0V5Y91GEEUglHRqnObnK/p+cAccQoetOaZVal7
A4UgFNZqfrU3fN5I/aghcBoOgt0P3mYjzL3eNSuvUU3B5Tc/Xy7hlWGY4N6EAsI5
nwZR38zmppavbEhp1nlNZQbTrDB3zyPltSY+pa/sJ/NH4GcHcg9zi7/jhJSMNtiT
h4XnQneR6r1nf8zcsVfGpN87MYlPeWvKBo1kDgO/IZ4aLYgtpg==
=fEDH
-----END PGP PUBLIC KEY BLOCK-----
You may notice mushrooms trying to grow inside the jar before the substrate is 100% colonized. This is not ideal because you are using up moisture in the cake for something that you won't consume, but it is a fact of life using the 1 pint jars. It is normal.
Back to preparation and colonization of substrate.
Back to table of contents.
One caution. Do not release the pressure until the unit is fully cooled. The substrate in the culture jars will be at 250 F. If pressure is released, moisture will boil out of the substrate.
Back to preparation and colonization of substrate.
Back to table of contents.
If you are doing twice as many jars as will fit in your terrarium, pack half of the jars very tightly.
Back to preparation and colonization of substrate.
Back to table of contents.
The main reason why this is sometimes worth while has to do with contamination. By far, the most likely spot for contamination to enter the culture jar is at the site of the inoculation. If you have a spore syringe that may not be entirely free of contamination, you can increase your probability of keeping the culture free of contamination by only inoculating one site. Note that commercial spore syringes are typically very sterile. If you do nothing to change this fact, it is best to inoculate at four sites in the culture jar.
In order to illustrate the point, assume that the spore syringe has
slightly 'dirty' contents but is still viable. Assume any given
injection site has a 50% chance of becoming contaminated. If you
inject only one site, the culture has a 50% chance of becoming
contaminated. If you inject four sites, the culture has a
Back to preparation and colonization of substrate.
Back to table of contents.
If you inject 1 cc of inoculate at each site, you will get many germination's and the cake will colonize significantly faster. You should place the beveled side of the syringe needle against the glass so that the inoculate is coming out of the syringe and heading towards the glass. It should form a thin puddle of liquid between the glass and the substrate. 1 cc of inoculate should produce a puddle several inches in diameter.
Back to preparation and colonization of substrate.
Back to table of contents.
There are several easy ways to accomplish this. If you have a floor heater with a pilot light and it is summer time (so the heat is not going to come on), you might be able to put the cakes in a shoe box and set them on the unit. The top of your water heater might be a good candidate. You can fill a cake pan half way with water and put a submersible fish tank heater in the water set to 80 degrees. Then simply put the jars in the cake pan.
However you choose to do this, make sure the temperature does not get above 90 degrees. Check out the heat source before you subject your cakes to it.
If you plan to have your terrarium at normal room temperature, then colonizing at 80 degrees will help you initiate a massive flush of mushrooms when you place your cakes in the terrarium.
Back to preparation and colonization of substrate.
Back to table of contents.
The second reason you will want to avoid doing this is the initiating of the fruiting process is triggered by three things. A drop in temperature, a drop in the CO2 level and light. You may confuse the fungus and inhibit a massive flush when you take the cake out of the jar. You will still get a crop, but it may take longer to consume the cake.
Back to preparation and colonization of substrate.
Back to table of contents.
Secondly, the process assumes that when the cake is removed from the jar it has sufficient networks in place to provide the nutrition needed for the fruiting process. If you take the cake out too early, this may not be the case.
Back to preparation and colonization of substrate.
Back to table of contents.
Back to preparation and colonization of substrate.
Back to table of contents.
Back to preparation and colonization of substrate.
Back to table of contents.
Back to construction of basic growing
chamber.
Back to table of contents.
Check all the gauges on the shelf. Most likely, some will deviate greatly from the rest. You want to pick one that seems to be accurate! Bare in mind that usually there are several different brands of gauges available. Check and see what various gauges from different brands are reading. Use some common sense to eliminate the obviously inaccurate gauges. Even so, you are making the assumption that at the high end of the humidity spectrum the chosen gauge will be accurate. Remember that absolute accuracy is not so important as knowing the relative conditions inside you terrarium over time. Even if you gauge is off a little bit, it will tend to be off in the same direction all the time. The easiest way to use a gauge during the growing process is to know what it used to read during previous growing cycles and keeping close to that reading. If a problem does develop, it will provide a clue which direction you need to move.
Back to construction of basic growing
Back to table of contents.
Back to Method 2, Using a Fish
Tank Bubblier.
Back to table of contents.
Back to Method 2, Using a Fish
Tank Bubblier
Back to table of contents.
Back to construction of Ultra Sonic support system.
Back to table of contents.
Back to the Growing Cycle.
Back to table of contents.
Back to Growing Cycle.
Back to table of contents.
Back to Drying and Preservation of Mushrooms.
Back to table of contents.
Note that this adaptation is mutually exclusive with Adaptation-21. If you try to combine them, it won't work.
Back to Method 3 of Terrarium Construction.
Back to table of contents.
A reservoir for moisture can be built into the cake while packing the jars with substrate material. Start with an empty jar and tamp 1/4 inch of substrate material in the bottom. Next, position a magic marker or some other object with a cylindrical shape and a diameter of about 3/4 inch in the center of the jar. Fill the jar as normal. Next, remove the object and fill the bore with damp vermiculite. Lastly, pack 1/4 inch of substrate material over the entire jar, sealing the damp vermiculite inside the cake.
The damp vermiculite can be mixed separately from the substrate material. Use about 1 cup of vermiculite and 1/3 cup of water. This should produce enough damp vermiculite for a dozen 1/2 pint culture jars.
After the cake has fruited, occasionally inject water into this reservoir. The easiest place to inject is the position of the cake that used to be at the center of the bottom of the jar. Just insert a syringe filled with sterile water and inject water until it is full.
In case you are wondering, the substrate material can't be injected with water directly. The rice flour and vermiculite form a very tight seal and it is next to impossible to inject water. Even if you do manage to inject water, it doesn't spread through the cake. Having this reservoir filled with damp vermiculite gives the mycelium network access to a lot of moisture.
The easiest way we have found to implement this adaptation is to cut the bottom off of a 10 cc syringe and press the bottom of the syringe into the wet vermiculite several times. This will load the syringe with wet vermiculite. Then place the syringe in the culture jar and pack the substrate around it. Use the syringe's plunger to hold the wet vermiculite stationary while you remove the syringe. Tamp an additional 1/4 inch of substrate material over the entire surface of the jar.
Back to preparation and colonization
Back to table of contents.
This document used to recommend using a timer that gives control on a minute by minute basis. These timers are becoming increasingly difficult to locate and more expensive. To accomodate this, there has been a strategy shift on this adaptation. Find a timer that lets you limit the 'On' cycle to 15 minutes. Intermatic makes two version that sell for under $15. They are model numbers SB811C and TB811C. They are available in the electrical section of Home Building Centers. You may also find them in the hardware section of a department store.
Since the shortest amount of time the timer can switch on is 15 minutes, it is important to make sure the cakes do not get water droplets forming on them in this much time. In general, the condensation filter chambers should be set up identically to the normal humidified chamber setup. You just may not need as many filter stages since the humidifier will not be running steady.
The other parameter you need to set is how tight to seal the chamber. You need to make sure the chamber's humidity does not drop too far during the 'Off' cycle of the timer. Typically, the 'Off' cycle is at least an 1.25 hours. (On the Intermatic timers, this coresponds to every third switch being up.) Ideally, you want the humidity to fall to 85% by the end of the cycle. (If your chamber seals tightly, you may be able to go every fourth or fifth switch).
Back to Building Terrarium with ultra-sonic humidifier.
Back to table of contents.
Rather than use brown rice flour available at a health food store, you can grind your own from long grain brown rice. Simply put the dried rice into a coffee grinder or a blender and let it chew the rice into a chunky flour. You will need to increase the water from 1/4 cup per 1/2 pint jar by 1 and 1/2 tablespoons. The chunky home ground flour absorbs a little more water than the normal flour.
Also, the home made brown rice flour seems to yield much more consistently and produce slightly more mushrooms per cake than store bought flour.
Back to preparation and colonization of substrate.
Back to table of contents.
Back to preparation and colonization of substrate.
Back to table of contents.
Back to construction of Ultra Sonic support system.
Back to table of contents.
Back to Making a Spore Print.
Back to table of contents.
Back to Making a Spore Print.
Back to table of contents.
| Last Modified Tuesday, 26-Oct-1999 22:12:46 PDT | Used by Erowid without permission of author |
| [ Back to Psilocybin Mushroom Vault ] |
|---|
[Plants & Drugs]
[Mind & Spirit]
[Freedom & Law]
[Arts & Sciences]
[Library]
[Search]
[About] (html and design © 2000 Erowid.org. Please ask permission before publicly
reproducing.)
|